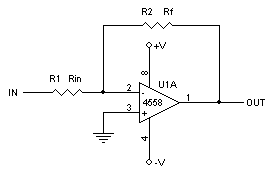
Figure 17
Many newcomers into electronics, especially those in the digital world, are often intimidated by opamps (operational amplifiers). They are quite simple but most explanations on how they work confuse the hobbyist. I will try to skip the theory and provide simple working circuits for you to apply right away.
Opamps are easy to design with as long as you follow some basic rules and understand how they operate. I won't go into all the theory of opamps, just the basics. This page will cover more fundamentals. The basic characteristics of opamps are as follows:
1) Assume the output impedance as almost zero.
2) Assume the - input impedance as almost zero.
3) Assume the + input impedance as almost infinite.
4) The gain is programmable by the feedback resistor, the resistor from the output pin to the negative input pin, from zero to infinite depending on the device.
5) An opamp can amplify AC or DC voltages, or both.
Most opamp designs require a bipolar power supply (plus and minus voltage) unless you offset the input to think it is operating on a bipolar supply. This will be explained later.
The circuit in Figure 17 is a basic inverting DC opamp configuration using a positive and negative power supply. (This circuit will also respond to AC also. AC circuits can contain DC blocking capacitors to keep the opamp operating within DC parameters but will roll off low frequencies depending on values and will not respond to DC. AC amplifiers will be discussed later.) For the purpose of this example let's say the power supply voltages are +/- 15 volts. A basic circuit uses two resistors. An input resistor (Rin) and a feedback resistor (Rf). In this example both resistors will be 10K ohms.

Figure 17
If you were to build this circuit and ground the input (0 volts), you will see 0 volts on the output. If you place +1 volts on the input, you will get -1 volt on the output. If you place -1 volts on the input, the output will be +1 volt. Why? Look at the formula in Figure 18 below.

Figure 18
Voltage gain (inverting) equals the value of the feedback resistor divided by the value of the input resistor for a gain of one, or unity. No gain, but an identical inverse of the input. If you varied the input voltage from +1 to -1 volts you will see the output swing from -1 to +1 volts. This could also be referred to as a linear amplifier because it tracks what ever voltage is on the input to the output in a linear fashion, only inverted. So what? Well, you have a unity gain inverting amplifier. What could this be used for? You have an input impedance of 10K ohms and an output impedance of almost zero ohms. Enough to provide drive for the next circuit or circuits. This could also be called an inverting buffer. How do you get 10K ohms input impedance? Remember, the inverting input, pin 2 is virtually zero ohms, so the input resistor (resistance) becomes the input impedance. What kind of gain would you have if both the feedback and input resistors were 220K? The same gain, only you have an input impedance of 220K ohms. Much less of a load so your input circuit won't "swamp" or load the preceding circuit.
Ok, let's make this thing actually amplify. Change the feedback resistor to 100K ohms while leaving the input resistor at 10K. Vary the input voltage to +1 volts. Now the output swings to -10 volts. Sweep the voltage all the way to -1 volts and you will see the output track all the way to +10 volts. This smooth output transition from -10 to +10 from a +1 to -1 input is why this circuit is also called a linear amplifier, because the output reflects the input times 10 only inverted. The formula for seeing a gain of ten is in Figure 19.

Figure 19
So from this basic circuit you can see how you can select different resistors to get different amounts of gain. Just remember, your output swing will never exceed the power supply voltages (or rails) and actually a volt or two less than each rail for a basic opamp in this demonstration. Raise the input voltage to +2 volts and measure the output and you will see that it rests somewhere around -12 to -13 volts. This is the "rail" or the lowest possible output voltage for the given +/- 15 volts. It also may be referred to as saturation of the opamp. Some opamps are called rail-to-rail opamps and they come closer to the actual power supply voltage. Almost 0.3 volts from the power supply voltage.
Next is a non-inverting opamp circuit. Figure 21 shows a simple non-inverting DC opamp circuit. For purposes of example the feedback resistor will be 100K ohms and the input resistors are 10K ohms.
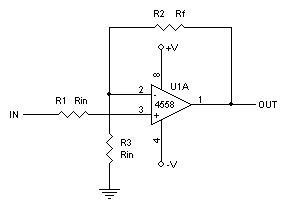
Figure 21
Putting +1.0 volts on the input will give +11 volts on the output. Putting -1.0 volts on the input will give -11 volts on the output.

Figure 22
Using the formula in Figure 22, we get a gain of 11 or eleven times the input. This can be used as a DC or AC amplifier. What if we wanted a gain of ten? Change the feedback resistor to 90K ohms. What if we wanted it to be exactly unity gain? Remove the resistor to ground. The feedback resistor can be any value. Look at Figure 23. How about a gain of 100? Use a 990k feedback resistor. However, you are asking for a lot of gain from the opamp. Don't forget, that's a lot of amplification. 1 volt on the input in theory will give you 100 volts on the output but that cannot happen because the power supply rails only supply 15 volts. So, you will "saturate" the opamp and it will slam up against the rail at somewhere around 13 volts. But, if you are amplifying a very small voltage such as 10 millivolts (0.01 volts), you will get 1 volt output. Remember, the gain number is the same as the multiplication factor. 0.01 X 100 = 1.
Use my opamp calculator to calculate your resistor values.
What other advantages does this circuit have? It is a true buffer. A buffer is a circuit that will duplicate the input voltage but provides drive. This is important if you have a high impedance circuit and you need to drive a low impedance load or many loads. Remember, the + input to the opamp is already a high impedance input. Thus, the input resistor is almost irrelevant with the exception of possible protection of the input to the opamp. Remember also that the output impedance is very low. Theoretically zero ohms but usually around 47 ohms depending upon the device you are using.
A buffer can also be called a "follower". It mimics the input with a low impedance output drive. The following circuit in Figure 23 is what is referred to as a follower.
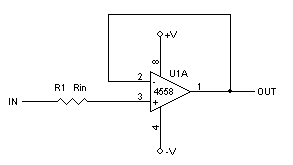
Figure 23
The input resistor can be almost any value since the input impedance is almost infinite or in certain circumstances it can be omitted (shorted). For good engineering practice R1 should be present just in case the power supply would fail the input circuit could be damaged. What ever the input sees will duplicated on the output. This can provide extra drive for another circuit without loading the input circuit. The feedback in this circuit is a short.
Let's talk about AC opamp designs.
AC circuits are typically used in audio amplification. Also mixing of signals, distributing audio, and processing audio. You don't really want to use a DC amplifier unless you know exactly what you are doing. DC circuits have their place in high quality audio amplifications but you must remember that the output will follow the input precisely. This is not an advantage for most applications. Input circuits of unknown DC potential can and will offset the amplifier and possible render it useless or drawing excess current. Especially if driving a speaker or headphones.
Figure 24 is a typical AC coupled opamp circuit used to amplify a weak signal.
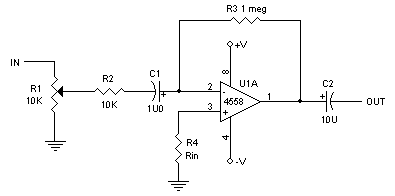
Figure 24
The above circuit has a gain of 100. With an AC signal of 50 millivolts (0.05 volts), you will see a output swing of +/- 5 volts. This circuit is typically used in the audio frequency range. The determining factor is the device itself which can amplify up to 1 megahertz but the gain will decrease at higher frequencies. You will have to study the data sheets for the device you will be using in order to determine high frequency gain. The capacitors will determine the low frequency cut-off. In some circumstances you could leave the capacitors out and the circuit will function down to DC. As you can see, the two capacitors are polarized. The positive leads are shown to be pointing towards the device. Since this uses a bi-polar power supply, the voltage potential is sitting at zero volts. Because of this, the capacitors can be placed either way as long as the input and output are referenced to ground. Also, R4 is not needed in most applications using a bi-polar power supply. The + input can be tied directly to ground.
Hint: When troubleshooting the opamp, placing a voltmeter on any inputs or outputs will show zero volts if there is no signal present. Any voltages other than zero means the circuit is not connected right or the opamp is defective.
Since bi-polar power supplies aren't always available, you can operate this same circuit from a single ended power supply. All that is necessary is that the -V pin is tied to ground and the + input is "biased" to half the power supply voltage. Of course you must realize that in order to keep the same headroom, you will have to double the positive supply. In most cases this isn't necessary especially if working with small signals. Also the two capacitors, C1 and C2, must be present in order to keep the opamp stable and operating in its linear region. Figure 26 shows how to connect the same circuit with a single power supply.
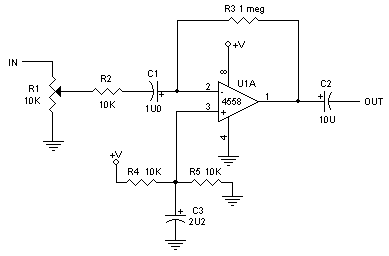
Figure 26
You can bias the + input by building a voltage divider, filtering it, and applying the 1/2 voltage to the + input. C3 is not a critical value. Neither is R4 and R5. They can be as high as 100K
Hint: When troubleshooting this circuit, both inputs and the output will be idling at 1/2 the power supply voltage with no signal present. Any voltage other than 1/2 the supply means the circuit is not wired properly or the opamp is defective. Example. If you are using a 12 volt supply, the DC voltage on pins 1, 2, and 3 must be 6 volts.
| A word of caution: If the output of any opamp is feeding a capacitive (shielded) line you should put a resistor in series with the output. Something from 10 to100 ohms depending upon circuit and load capacitance. This will prevent "ringing" on the output stage. It is not necessary if feeding another on-board stage. Also you may need to limit the high frequency response on some opamps by placing a capacitor across the feedback resistor. In audio applications especially with 5532 opamps a ceramic capacitor around 100 pf will lower high frequency noise. Consult datasheets for specific devices for more information. |
Frequency response - the usable bandwidth of the circuit. This is usually the 3db point. An example is in Figure 26, R2 and C1. The impedance is 10K ohms and the capacitance is 1uf. Using the formula f=1/(2Pi*(R*C)), the usable low frequency is down to16 HZ.
An opamp can also be used as a bias generator (or reference) for providing 1/2 the power supply voltage for other opamps on the same board using a single ended (uni-polar) power supply. Figure 28 shows the circuit.
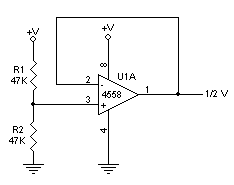
Figure 28
Since the + input is a high impedance input, the values of R1 and R2 can be almost any value as long as they are the same value. The arbitrary values of 47K will not provide a noticeable drain on the power supply. Depending on noise and stability, it may be necessary to place a small capacitor (U10) from the + input to ground but it is not mandatory. In Figure 28, if the +V is 24 volts, the output will be +12 volts. If the +V is 5 volts, the output will be +2.5 volts. To turn this circuit into a power regulator, replace R2 with a zener and R1 with an appropriate value, and the output of the opamp will provide a buffered regulated voltage source.
What device should I use? It depends on what you want to use it for. For most applications, general purpose opamps can be used. The most common is the 4558 or 1458 (DigiKey MC1458P $0.40ea, Jameco $0.29ea) which is a dual opamp in one 8 pin dip package, also available in 8-SOIC surface mount package. The old standard is the 741 which is a single opamp in an 8 pin dip package. Some devices also have pins for compensation or offset control but for most applications, they are not required. A low noise high performance device is the 5532 (DigiKey NE5532P $0.80ea, Jameco $0.49ea). Same pinout as the 4558. However, since it is high performance with excellent high frequency response, you will have to roll of the high frequency with a 33PF feedback capacitor across the feedback resistor. Most opamps use the same pinouts. There are also quad opamps like the 324 (DigiKey LM324N $0.49ea, Jameco $0.26ea) and the Norton current mirror opamp like the 3900 (DigiKey LM3900N $0.90ea, Jameco $0.77ea). Opamps can be used in may applications like integrators, comparators, oscillators, filters, mixers, etc.
Not all opamps have the same type of output. Some have an "open collector" output, some will pull high more than they pull low, but most will drive either way the same.
There are also fet input opamps like the TL072 (Jameco $0.29ea).
Glossary
Headroom - The maximum usable voltage output of an opamp.
Rail to rail - The actual power supply buss voltages. Even a rail-to-rail opamp doesn't reach the actual rail but comes within 1/2 volt of the rail.
Roll-off - The 3db point or the usable bandwidth of a given circuit.
Follower - A circuit whose output duplicates the input with more drive. Usually unity gain.
Buffer - Similar to a follower but can amplify and/or invert.
Gain - The difference between the input and output.
Noise - Unwanted very low level random signals below the useful range. If amplified too much, will interfere with signal.
Closed loop - A feedback path that programs the gain.
Open loop - An opamp stage with no feedback that deliberately produces infinite gain.
Bi-polar - (In this context) Two power supplies of opposite polarities.
Offset - Usually a DC level introduced to the input that will add to the output stage.
Linear -
Please contact me for any questions or problems understanding these circuits and I will try to answer, time permitting.
Also see "Why
is my regulator overheating?
©2016 Rick C.