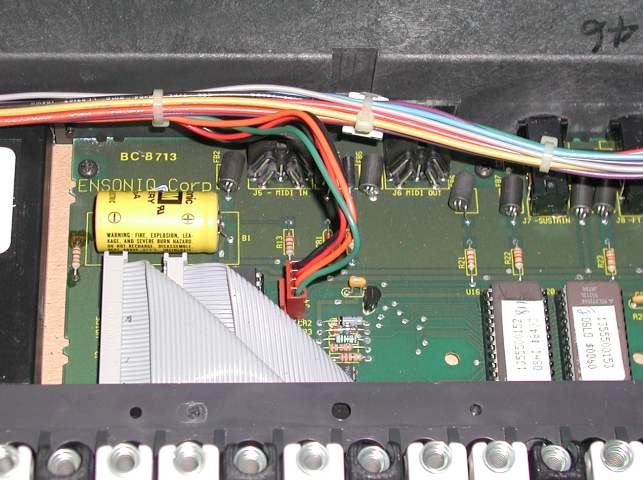
The battery is obviously the yellow cylinder slightly left in the picture
Updated May 2009
Note: This procedure will cause the internal patches and sequences to be lost. Save all your patches and song sequences to external devices such as your external cart, tape deck, or via midi to a computer. Consult the operation manual for instructions. If you don't know how, or cannot interface to your computer but have a working PC with a sound card, try taking the tape out from the ESQ1 and connect to the "record in" on the sound card and record your patches into a wave file, 16 bit, 44.1k .wav format. You can see a more detailed procedure here: http://www.pic101.com/ensoniq/alternate_method.htm When saved, verify that the waveform is clean and close to maximum amplitude. Make any adjustments to the record console in Windows to accomplish this. After replacing the battery, play the waveform into the ESQ1 play input following the procedure described in the operation manual under "Tape load and save" procedures.
Warning: When working inside the ESQ1 keyboard, make sure you ground yourself to the chassis to prevent any unwanted static discharge that will damage some of the integrated circuits and render your keyboard useless.
I do NOT recommend installing a battery holder and using removable alkalines or lithiums. The battery or holder may jar loose in transit or the unknowing musician, in a hurry, could install the battery backwards and destroy the ESQ1.
I do NOT recommend mounting the batteries so they are accessible from the rear for easy replacement. A static discharge will wipe the keyboard out. All the diode protection you could install won't help.
I have already had numerous emails from bold individuals who did not heed the above warnings and now have destroyed ESQ1's.
The less time you spend tinkering around inside the keyboard, the less chance you will cause irreversible damage. Replacing the battery once every 15 to 18 years is by far the recommended procedure.
Replacing the battery is easy depending upon your soldering experience.
Disconnect power and all cables from rear panel, remove four (3/32) Allen head screws on the top. Open the cover. You may
encounter some resistance when lifting. You'll have to be a little firm as there are two tabs on the
rear left and right sides that you'll need to get around. Pull the two front
corners of the cover towards you and give it a quick jerk upwards and it will
release. Open all the way. Unplug the three connectors from the power supply. Depending on the model and release version, you may have a metal
shield covering the main board. If so, remove the six
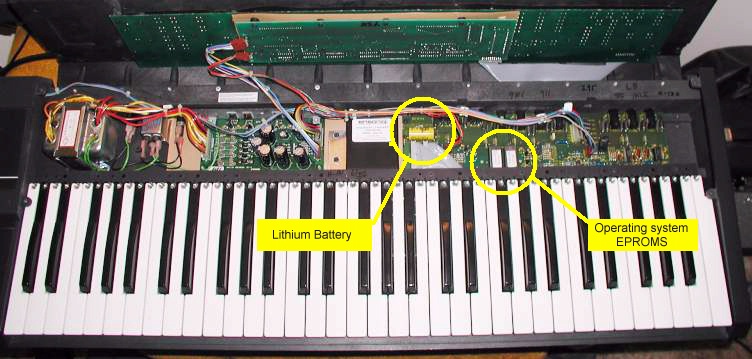
Phillips head screws holding the shield down. You will see the battery on the left
side of the board. With a good soldering iron it is possible to remove the battery by unsoldering it from the top. Use some
solder wick or a solder sucker to remove the solder from the holes before inserting the
new battery.
If you are uneasy about doing this yourself, try to find a knowledgeable
"ham" (Amateur Radio) operator in your neighborhood. He may be able to
do it or know someone who can. Many of them have soldering skills and will be
able to tackle the job for a reasonable price; maybe even for nothing.
The battery is obviously the yellow cylinder slightly left in the picture
*** MAKE SURE YOU NOTE THE POLARITY OF THE BATTERY!!! ***
The (+) to the inside of the board and the (-) to the edge of the board.
It is also a good idea to take a felt tipped pen and write on the battery and/or on the circuit board near the battery, the date you replaced it. This will help remind you when you may need to replace it again. If you have a shield. write it on there too.
When finished, don't forget to re-install the shield.
|
Word of caution. |
Make sure you do a full reboot when finished. Hold the "record" and "soft button #1" at the same time. Answer yes to reboot and reinitialize.
I get my batteries from Digikey. They are two pin, 3 volt, 1200 ma, 2/3A cell, part number P226-ND
As a last measure you could also use a lithium photo battery Duracell type DL123AB (or CR123A, EL123A) however they don't have solder tabs and you will be replacing them much more often. It is possible, in a pinch, to solder wires to the battery but you could damage the battery if you're not careful and apply too much heat. Some major battery retailers will spot solder tabs to the cells for easy soldering.
Go to Digikey and enter P226 in the search window
and click on Lithium.
As of this posting they are US$5.63 each but there is a handling charge of US$5 for orders under US$25.
Any questions or comments may be direct to Rick.